Part 2 - How-To: R1 Fork Conversion
Step 9
Remove Upper Triple Clamp
1. Using a plastic/wooden knife or fingernail, "pop" off the black plastic caps located on the "inner" end of each Clip-On. (1) Per Clip-On
2. Remove (1) 5mm Allen bolt located beneath each plastic cap on each clip-on
3. Remove Bar Ends on BOTH Clip-Ons.
4. Using a medium size zip-tie (or similar object), lube with some silicone spray/oil then slide it beneath the Left handgrip until it reaches the switch. Using some "twist" force you will loosen the "seal" and be able to pull the handle grip off
5. Remove (2) Phillip screws attaching the Turn Signal Switch to the LEFT handlebar
6. Remove the Turn Signal Switch and immediately re-assemble switch with both screws 7. Allow Choke Cable to hang. If Choke Lever falls off, store in a safe place for later use 8. Loosen the 10mm pinch nut on the Clutch lever holder
9. Disconnect the Clutch safety switch located just below the clutch cable adjuster
10. Loosen the LEFT Clip-On 6mm Allen pinch bolt
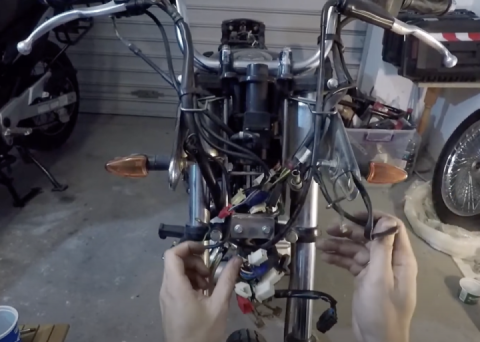
Step 10
Remove Lower Triple Clamp and Fork assembly
1. Remove Steering Stem Retainer/plate located just below the Upper Triple Clamp
2. Remove Steering Stem Upper "jam" nut. (May require using a C-spanner wrench, I used a large flat tip screwdriver and a dead-blow hammer to tap it in the slots to loosen it)
3. Remove and set aside rubber washer
4. While supporting the Lower Triple Clamp and Fork assembly, remove the Steering Stem Lower Nut and set aside
5. Remove Stem/Lower Triple Clamp/Fork assembly through neck and set aside.
Step 11
Remove Forks from Lower Triple Clamp
1. Loosen ALL (4) 6mm Allen pinch bolts on Lower Triple Clamp
2. Using a Flat-blade screwdriver spread each side of the Lower Triple Clamp to allow each fork to slide out
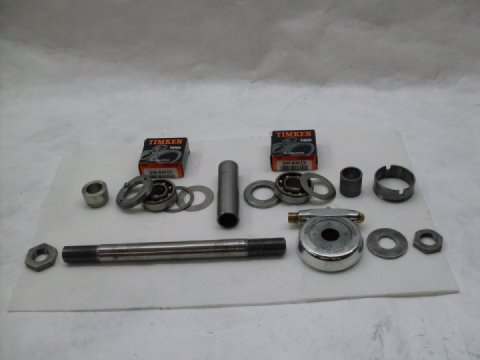
Step 12
Swap Steering Stems
1. Due to the difference in Stem length (approximately .75"), both stems need to be swapped
2. Unless you have a Hydraulic Press handy, you will need to visit your local machine shop, auto parts store, or dealership and have them PRESS/REMOVE the Lower Bearing Races and Stems on BOTH the R1 Lower Triple Clamp and the R6 Lower Triple Clamp
NOTE: The Stems on both Lower Triple Clamps are tapered and secured with a snap-ring! Care must be taken to have the stems pressed DOWN! This means the LONG exposed end of the stem will go through the triple clamp when properly pressed
3. Using the R6 Stem (with snap-ring) and R1 Lower Triple Clamp, you insert the R6 Stem into the R1 Clamp until it bottoms out on the snap-ring
NOTE: Pressing is not required to re-install the R6 stem into the R1 Clamp, but it is a tight fit. I had to sand it lightly to make it smooth and really get on it with a dead-blow hammer. If you’re having somebody press it out, just have them press the new one on as well as the bottom race…it’ll save you time and a little aggravation.
4. Install the lower bearing
NOTE: Do not forget to install the dust seal BEFORE installing the new lower bearing!
Step 13
Reassembly
1. The reassembly process is the reverse of disassembly but we need to keep a couple of factors in mind
2. Using the fork measurement taken prior to disassembly, we have a very good starting point and setting to set the fork height in the triple clamps
3. Some custom fabrication is required to reattach the original horn, dust shield and master cylinder reservoir (I just ditched the dust cover...)
4. On the R6, unless you decide to remove your Ram Air covers, the R1 clip-ons will be ABOVE the Upper Triple Clamp
5. Unless you are using Aftermarket Clip-ons, there will be a small gap between the clip-on and Upper Triple Clamp where the alignment/index bolt goes, you can be creative and come up with a “cover” to hide the alignment bolt
6. Fasten all steering fasteners to factory specifications as per R1 specs
7. Measurements will need to be taken from the original R6 Clutch Side Clip-On. The alignment holes on this clip-on which align and hold the switch assembly needs to be transferred/re-drilled to the R1 Clip-On. The Brake Lever side went in just fine for me (but I may have gotten them off ebay from somebody who already attempted the swap and had the hole pre-drilled. I never did find out, so double check the other side as well)
8. Unless you plan to CUT and remove the original ignition/lock assembly from the R6 Upper Triple Clamp, you will need to extend the wiring harness on the R1 Ignition Cylinder
9. If you have a side mounted steering damper, you will need to get a replacement Fork Clamp in the size of 54mm (Original R6 size: 43mm)
10. Remove the LEFT Clip-On from the LEFT fork and at the same time SLIDE the clutch assembly off
11. Allow Clutch assembly to hang
12. Remove (2) Phillip Screws attaching RIGHT side Kill switch, leave Phillips screw that holds throttle cable in place
13. Loosen 6mm Allen pinch bolt on RIGHT side clip-on
14. Remove RIGHT side clip-on from RIGHT Fork; to do so, you will need to PARTIALLY split the Kill Switch assembly. This will allow you to SLIDE the Kill Switch AND Throttle Grip as one unit off the RIGHT side clip-on
15. Immediately re-install both screws onto the Kill switch
16. Cut/Remove Tie-strap retaining Ignition Lock/Switch harness to Lower Triple Clamp 17. Remove Upper Triple Clamp center mounting nut using a 1.25" Socket
18. Remove washer located just below nut
19. Loosen (2) Upper Triple Clamp pinch bolts located on both Fork sides
20. Remove Upper Triple Clamp assembly and lay aside
21. At this point, the R6 Ignition Cylinder needs to be removed. To do this, I used a dremel with a pencil adapter and small cone-shaped grinding stone to grind down the heads of the (2) bolts that secure it to the Upper Triple Clamp. It worked well, but still took some time. Be prepared to grind for about 30 minutes. I found grinding worked better than drilling. Once done, though, you’ll be satisfied you did this instead of using an R1 cylinder and lengthening the wires and having to carry (2) different keys.
Note: Be sure to cover everything that’s exposed with some towels or something similar as well as cover the air duct inlets, there will be a lot of metal particles flying around and you don’t want those inside the air box (even though there is a filter, why take a chance?). It’ll also make for less of a mess to clean later.
22. With the Ignition Cylinder separated from the Upper Triple, let it hang to the side and find a creative use for your now-useless R6 Upper Triple

 Follow
2.2K
Follow
2.2K